|
DiskMagik offers advanced scheduling capabilities using powerful the Command Line option. Most computer professionals are well acquainted with Windows Command Line usage and scheduling tasks with the Windows Task Scheduler. This tutorial is intended for users who do not have experience with the Task Scheduler. We hope this tutorial will provide a simple and straighforward way to begin using powerful Windows feature in Windows XP. (NOTE: A similar Windows Vista tutorial will be available soon.)
|
|
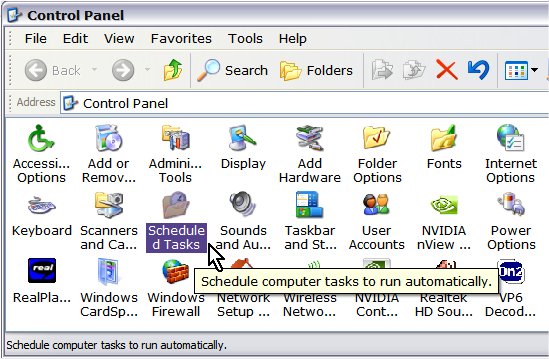
1) Open Windows Control Panel from the Start Menu and open the Scheduled Tasks applet.
|
|
|
2) Choose Add Scheduled Task to launch the Scheduled Task Wizard.
|

|
|
3) With the Scheduled Task Wizard click Next to continue.
|

|
|
4) Click the Browse button to locate the DiskMagik folder.
|

|
|
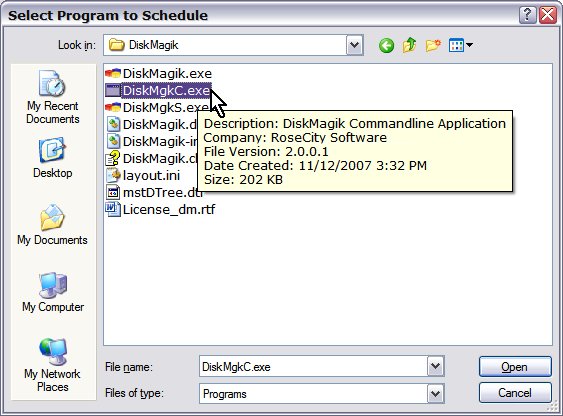
5) Navigate to the DiskMagik folder, and then doubleclick on "DiskMgkC" (the .EXE extension may be hidden) to enter the DiskMagik command line utility into the Scheduled Task Wizard.
|
|
|
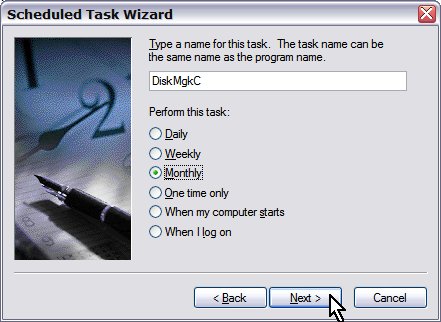
6) Select the frequency of the defragmentation schedule you wish... Daily, Weekly, Monthly, etc. We suggest a monthly schedule if you are running DiskMagik's Proactive Defrag (see option in the program configuration available from the main Edit Menu). You may wish to schedule more often if you are adding and deleting a lot of files or installing and uninstalling a lot of software.
|
|
|
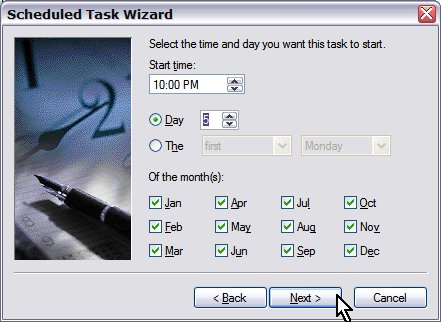
7) Select the time and day you want this task to start and click Next.
|
|
|
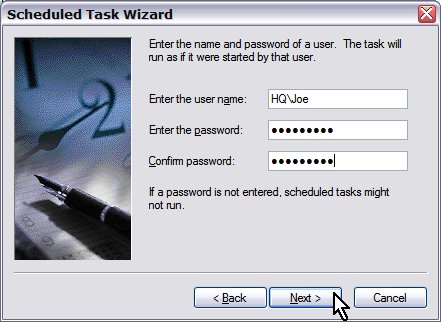
8) Your computer username should be pre-filled here. Enter your Windows Password in the next field. (Hint: Type it somewhere where you can read it and then copy it to clipboard and paste it here as you will need it again in another few steps to complete the scheduling. Avoid any extra spaces.) NOTE: If you do not have any password set to log on to Windows, you can simply click Next.
|
|
|
9) Check the Open Advanced properties check box and click Finish to add this task to your Windows schedule.
|

|
|
10) The Advanced properties dialog will open and should read as indicated in the screenshot below.
|

|
|
11) Here's where you must enter the kind of scheduling you want to enable. DiskMagik offers a number of scheduling options. For this illustration we will enter the parameters to run a Complete Defrag (action or /a) on the C: Drive (drive or /d). To do this click just at the end of the string in the Run field after the last QUOTES mark, enter a single space and then this /a:DefragComplete /d:c Either copy and paste this string or type it but be sure you leave only one space after the word Complete. Then click Apply. Note: the scheduling options window will tell you what to do if you do not have a Drive letter assigned to the drive you want to defragment.
|

|
|
12) When click Apply you will be prompted a second time to enter your Windows password. Copy and paste again as before or type it carefully. As before, if you do not have any password set to log on to Windows, you can simply click Next.
|

|
|
13) Click on the Settings tab at the top of the dialog and configure the task as desired. The recommended options are indicated in the screenshot below.
|

|
|
14) Click on the Schedule tab to verify the settings you entered in the wizard. You can change it here any time without redoing the wizard.
|

|
|
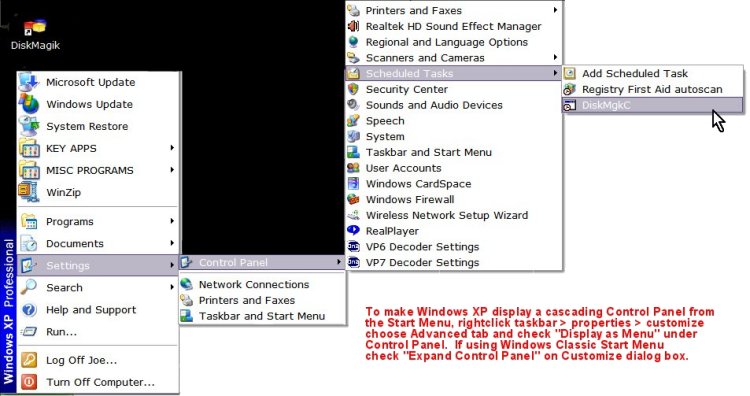
15) To reopen the Task Scheduler at any time return to Control Panel and selecting the Task named DiskMgkC in this tutorial. You can do it by opening the Control Panel or by selecting it from the cascading menu if you have it configured for the Start Menu. (instructions below this screenshot)
|
|
|
In Windows XP to make Windows display a cascading Control Panel from the Start Menu, rightclick taskbar > properties > customize and choose Advanced tab and check "Display as Menu" under Control Panel. If using Windows Classic Start Menu check "Expand Control Panel" on the Customize dialog box.
|
We hope you have found this tutorial instructive. Remember if you use DiskMagik's exclusive Proactive Mode, then you do not need to run a manual defrag very often. Rather than scheduling it, you may just want to make yourself a note to do it once a month, or whenever your system response time seems a bit sluggish.

|
|


